Table of Contents
You’ve finally decided to bring your idea online, and that’s a big step. If you are creating a portfolio, a small business website, a blog, or your first online store, building a WordPress site can feel exciting, but it can be a little confusing at first.
If you’re asking yourself, “Where do I start?” or “How do I make sure I don’t miss anything?”, you’re reading the right blog.
This essential WordPress website launch checklist makes everything easier. It walks you through each step so you can move from setup to launch without stress. Once you follow all the steps, your website will look clean, professional, and ready for people to visit.
Complete WordPress Website Launch Checklist
1. Select the right WordPress.com or hosting plan

If you haven’t already created an account with WordPress.com, this is where your journey begins. Or pick the custom hosting plan that best supports what you’re trying to build. Since everyone’s goals are different, let’s imagine a scenario.
Suppose you want to turn your passion for painting murals into a side business. You’ve already created beautiful pieces for family and friends, and people constantly tell you that your work deserves a wider audience.
And who knows, maybe if things go well, this part-time work could become a full-time creative career.
Because you’ll want the ability to accept payments from clients, you’ll need one of the paid plans. If you plan to upload videos that highlight your projects, a Premium plan or higher will give you the features you need.
If you want to install outside themes or work with advanced customization options, the Business plan is the most flexible choice.
2. Pick a domain name for your website

Once you’ve selected your plan, the next step is choosing your domain name. Start by typing some words or phrases related to your brand or what you do, and WordPress.com will automatically suggest available domain names.
In this example, let’s say your business is called “Milly’s Murals.” When you search for that name, WordPress.com will present a list of available domains based on your keywords.
Most professional domains are free for the first year, or you can stick with a free WordPress.com subdomain if you’re just getting started.
3. Choose your website’s design

Now comes to choose the design for your site. Select a theme that fits your personality and the style of your work. Don’t worry if you’re unsure which one is perfect, because you can always change to a different theme in the future.
Once you’ve chosen a design, you’re all set to begin adding real content to your website. Let’s move on to building your pages.
4. Add all essential website pages
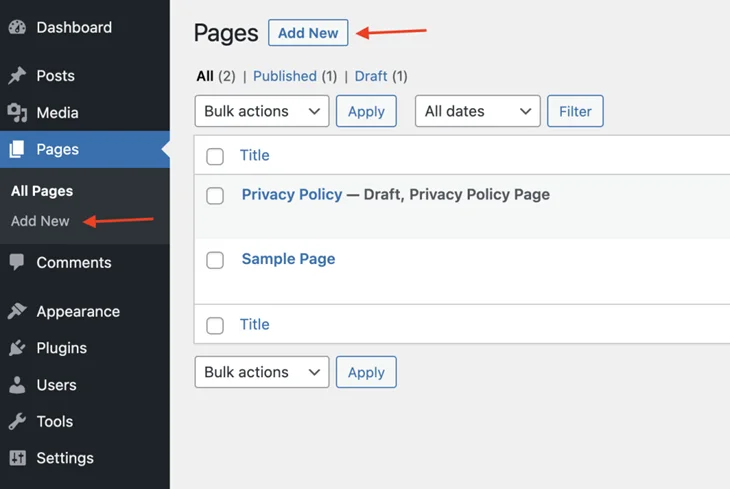
While each site is unique in its own way, the majority of visitors will most likely to see some standard pages, such as:
- Homepage
- About page
- Contact page
- Product or service pages
- Blog (optional)
Start with the homepage that WordPress.com provides by default. Replace the filler text and images with visuals and wording that reflect your brand and message.
After updating your homepage, begin adding the remaining pages. WordPress.com makes this easy by offering pre-designed templates that you can insert instantly, then customize to match your style. Of course, you can also start from a blank page if you prefer building everything from scratch.
Once your main pages are in place and customized to your liking, it’s time to focus on the supporting pieces of your website experience.
5. Review and refine your site header
Your header is one of the first things visitors notice when they land on your site, so make sure it includes everything they need.
The most essential component of your header should be your logo. The integrated logo tools on WordPress.com can assist you in creating a logo if you don’t already have one. Also, adding a short tagline can help visitors understand what your website is about at a glance.
Maybe you would like to put an email address or a phone number for the visitors to be able to contact you. It’s also great if you put social media links in your header because it helps visitors engage with your business on the different platforms.
The navigation menu, which is also the main focus of your header. You need to check whether it is working properly or not. Depending on your theme, you can update your header through:
- The Customizer (Classic Themes).
- Plugins.
- The Site Editor (Block Themes).
6. Check your footer
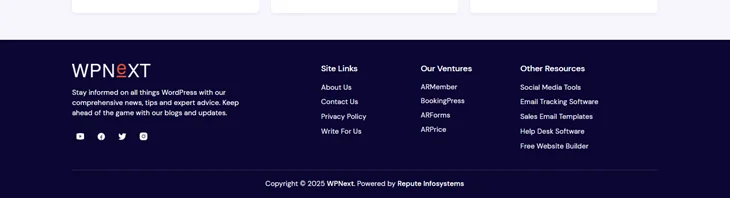
Visitors naturally look to your footer for important information, so make sure it contains everything they need. Your footer should include direct links to your privacy policy and terms of service, as these are essential pages for transparency and legal compliance.
If there are other pages that may be helpful for visitors, such as your About page, social media profiles, FAQs, or customer support page, add those links here as well.
On the web, you’ll find a wide range of footer layouts, from simple to highly complex. If you’re unsure of what to include, WordPress.com is a great place to start because it comes with a clear, adaptable footer by default.
7. Optimize your website navigation menu
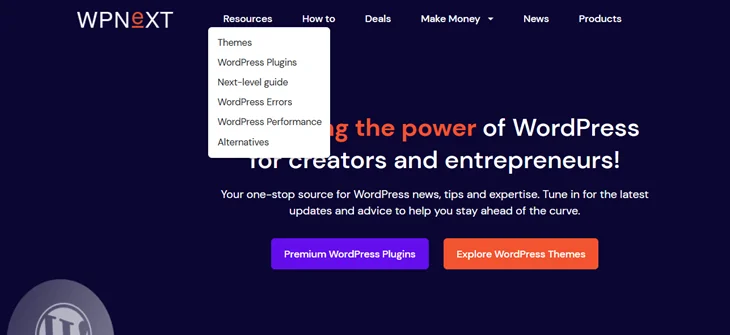
One of the most important elements of your website is your navigation menu. A well-organized menu makes it easier for customers to find what they’re looking for quickly and without getting lost or confused.
Each page should have consistent navigation that makes sense. Make sure all of your links are simple and easy to understand by giving them clear names. Use clear and descriptive labels that guide visitors to exactly where they want to go.
By keeping your menu structure clean and intuitive, you reduce friction for your visitors and help them easily explore your site. If you want more help designing an effective navigation, WordPress provides additional tips and tutorials you can explore.
8. Test all forms on your website
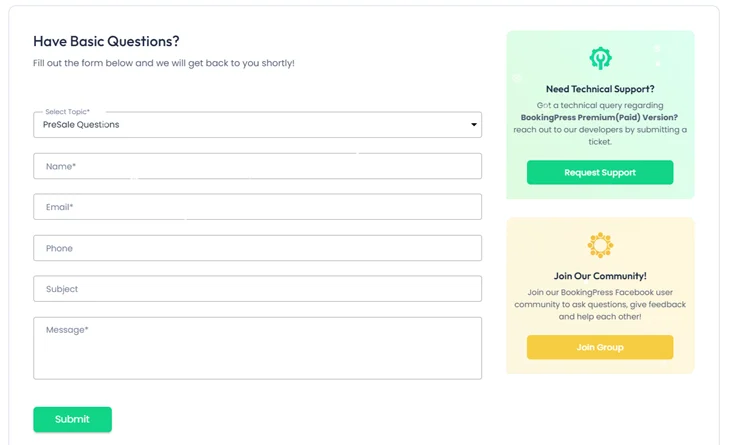
There is at least one form on each website, usually a contact form. Before launching, complete your test information forms and confirm:
- The form submits correctly.
- Required fields like name and email are included.
- The message is delivered to the correct inbox.
- All entered information appears exactly as expected.
9. Test your website responsiveness
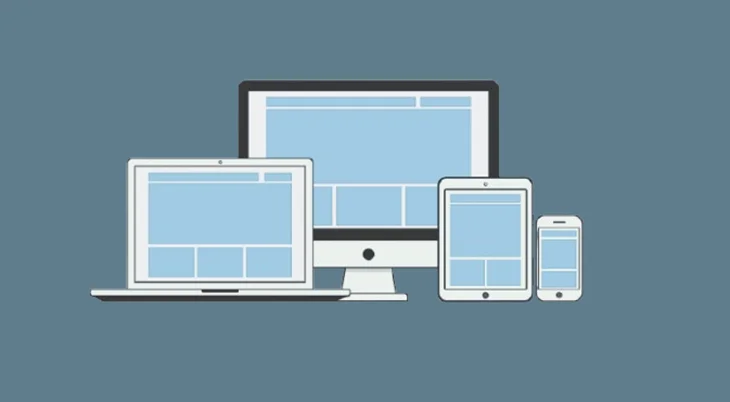
Visitors will view your website on different devices, so it’s important to have mobile responsive website. Test your layout across desktops, tablets, and smartphones. Your design should adjust smoothly as the screen size changes, keeping your content readable and visually balanced.
Don’t forget to test your website using different browsers as well. For example, check how it behaves on Chrome, Safari, Firefox, and Edge. Each browser can render elements slightly differently.
10. Identify and fix broken links or images
Open your website using a browser that has never visited your site before. This ensures you’re not seeing cached images that might hide issues. If an image on your site is missing or incorrectly linked, a placeholder will appear; fix that to make a smooth browsing experience.
Broken images create problems like:
- Increased page loading time.
- Missing visual content.
- Unexpected layout shifts.
After that, verify that all the links on your pages are working properly by individually clicking each one and making sure none of them lead to a 404 error page.
11. Test and optimize your site’s speed
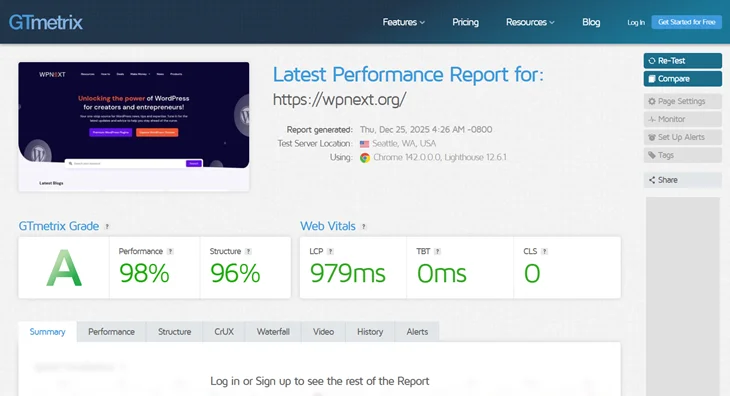
No one likes to wait for a slow website to load. To know the performance of your website, use a speed testing tool such as GTMetrix. To maintain consistent results, select one speed tool and use it consistently. This is because different speed tools use different testing methods.
WordPress.com already offers high performance hosting, but if you want to further improve your site speed, follow their optimization tips. Fast websites provide a better user experience and are often favored by search engines.
12. Check your website’s security
Use strong passwords, unique usernames, and two-factor authentication to protect your login area. These small steps significantly reduce the risk of unauthorized access.
13. Proofread your website copy
Check the website content and fix typos to maintain credibility and prevent costly errors. One of the best ways to perfect your work is by reading it aloud to yourself, which enables you to spot those awkward phrases and clarify those sentences that are not clear to you.
Besides that, asking a friend or a colleague to look through your content and give feedback can also be a very helpful step. Software such as Grammarly and Hemingway can be of great assistance in identifying grammar, spelling and readability issues.
14. Ensure that all authors have a user account
If your website features multiple writers, each author should have their own user account. This helps build trust and authority. While you could manually type “By John Doe” at the top of a post, having an actual author account is more credible.
Visitors can click the author’s name to see all their posts in one place. You can add new users by going to Users > Add New in your WordPress dashboard. Assign each person the appropriate role, such as Administrator, Editor, Author, or Contributor.
15. Check the Gravatar profile for every author
Ask your authors to fully complete their Gravatar profiles. A Gravatar (Globally Recognized Avatar) is an image and profile that automatically appears next to the name on any Gravatar-enabled site, including WordPress.
Author boxes on your website may display your authors’ images and brief biographies once they have finished their Gravatar profiles. This makes the content consistent and gives readers a better understanding of the people who created it.
16. Check your website URL structure
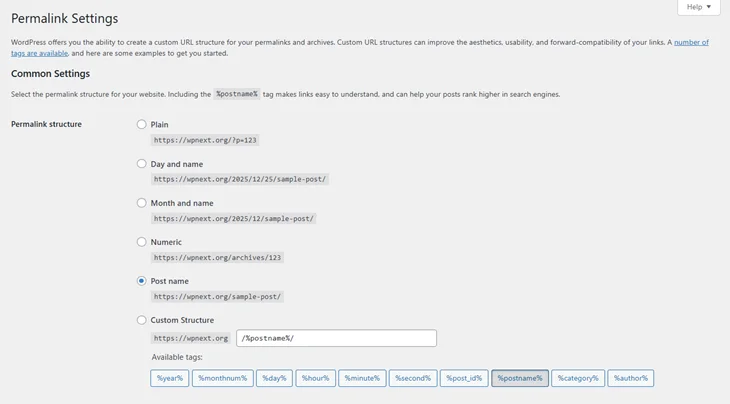
WordPress automatically generates a permanent URL for each page and blog post. These URLs are known as permalinks, and you can choose how they are structured. Search engines often use the words in your URLs as clues to understand the topic of your page, so having clean, descriptive permalinks is extremely helpful.
The default WordPress permalink format looks like example.com/?p=123, which isn’t ideal for visitors or search engines. A cleaner format, such as example.com/contact-us, is far more meaningful and easier to remember. It also helps Google understand what the page is about.
You can configure your permalink structure by going to Settings > Permalinks. The “Post name” setting is a popular choice, but different structures may work better for specific use cases. But you have to keep them consistent on all pages.
17. Make a website backup

Once everything is set, make a Backup of your website. Because if something goes wrong, such as accidental deletion, hacking, or a broken update, you can restore your site to the most stable version.
WordPress.com users benefit from automatic Jetpack powered backups. If you’re not using WordPress.com hosting, consider tools like Jetpack Backup or reliable third-party backup plugins.
Let’s Launch Your Site
If you reached the end of the WordPress website launch checklist, that means your WordPress website is finally ready to go live. All that’s left now is to click to Publish and share your website with the world.
With this website launch checklist, you can launch your site confidently, knowing you’ve covered everything that matters.
Related Blogs:
- Create Engaging Content with the WordPress Gutenberg Editor
- How to Troubleshoot WordPress Websites?
- Why Updating WordPress Matters & How to Do It Without Risk
- Step by Step Guide to Add Search Bar in WordPress Website
Frequently Asked Questions
Do I need a paid WordPress.com plan to launch a website?
Not necessarily. A free WordPress.com plan is enough to make a simple website, but to have functionalities such as accepting payments, using premium themes, installing custom plugins, or having advanced design tools, a paid plan is required, or you can purchase other hosting plans.
What should I do if I can’t decide on a theme?
What you need to do at first is to worry less. WordPress themes are changeable at any time, so take one that seems to be your style and proceed with the creation. As your content grows, you can adjust or change the design later without affecting your posts or pages.
Why are mobile responsive websites and speed so important before launching?
People visiting your site today most of the time use several different devices, and they expect websites to load fast and with proper formatting. A fast, well-formatted site enhances user experience, encourages more interaction, and helps improve your visibility in search engines.
How often should I back up my WordPress website?
Backups should happen automatically on a regular schedule. For most websites, weekly or monthly backups are ideal. If your site changes frequently, such as an online store or active blog, then you may need even more frequent backups. This guarantees you can restore your site quickly if something goes wrong.