

Table of Contents
Imagine selecting t-shirt colors based on color names without first seeing a single shade. How disastrous for your customer experience. Simply letting your customers visualize the t-shirt colors would boost your conversion rate. This cool feature is known as product variation swatches for WooCommerce. Variation swatches solve this problem by displaying all available options before the customer makes a selection.
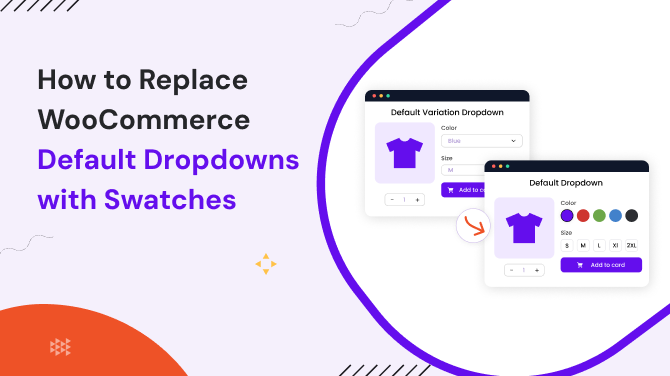
By default, WooCommerce provides a dropdown option, which doesn’t let customers experience what they are choosing. This can easily be replaced with WooCommerce variation swatches using a WordPress plugin. With swatches, you can showcase clear color, image, label, or button choices on product pages. This simple change helps shoppers compare options faster, while WooCommerce still manages every valid product variation behind the scenes.
Today, we will learn how to replace the default dropdown with WooCommerce variation swatches without any coding through a simple, step-by-step setup.
Why Do Product Variation Dropdowns Slow Buying Decisions?
WooCommerce dropdown options still work for products, but they make shoppers search for choices that could already be visible at ease. Baymard found 28% of desktop stores with many sizes still use them, and this exposes common shopping problems.
That extra search creates three common problems: hidden options, harder mobile use, and weaker visual understanding.
Hidden Options Add Friction
Variation dropdown menus hide colors, sizes, materials, and styles until shoppers open each field and inspect the available choices. Repeated clicks to compare several attributes slow the scanning process and add unnecessary friction to product selection.
Mobile Shoppers Feel It More
Native selector menus are difficult to review on small screens and such menus may cover nearby product details entirely. Proper spacing makes for comfortable touch targets for shoppers and makes it easier to scan and tap visual swatch buttons.
Visual Products Need Visual Choices
Shoppers often judge clothing, footwear, cosmetics, furniture, accessories, fabrics, and printed products by appearance before buying. A label like “Blue” gives limited detail, while a visible swatch offers instant visual confirmation before customers choose.
Dropdowns vs Visual Swatches: Which Helps Shoppers More?
Dropdowns hide product choices inside text menus, while visual swatches show colors, images, labels, or buttons upfront. Both help to select valid variations, but WooCommerce variation swatches require less effort to understand and compare available options.
| Comparison Point | Default Dropdowns | Visual Swatches |
| Option visibility | Hidden until opened | Visible on the product page |
| Color selection | Shows written color names | Shows actual color samples |
| Pattern selection | Hard to picture from text | Image swatches display patterns |
| Size selection | Lists sizes inside a menu | Shows sizes as clear buttons |
| Mobile interaction | Requires opening a selector | Allows direct taps on options |
| Design control | Often depends on the theme | Offers greater styling control |
| Best use | Simple and nonvisual options | Visual or frequently compared choices |
This comparison makes one point clear: both options work, but each suits a different type of product.
Which Option Helps Shoppers More?
Dropdowns still work when a product has one simple, nonvisual choice and only a few options. However, visual WooCommerce product swatches help shoppers more because they keep every choice visible and easy to compare.
It works especially well for colors, patterns, sizes, materials, and other appearance-based product options online. Your shoppers can understand differences faster, notice selected options, and choose with greater confidence before purchasing.
- Product options stay visible, so shoppers do not need to open separate menus repeatedly.
- Colors, patterns, and sizes become easier to compare during the same product page visit online.
- Selected choices remain clear, which helps shoppers avoid confusion before adding products to their carts.
- Mobile users can tap visible swatches directly without opening cramped dropdown selectors on smaller screens.
- Store owners also gain more control over spacing, borders, labels, and overall product presentation design.
For basic text choices, dropdowns remain practical, but visual swatches usually create a clearer shopping experience.
How to Set Up WooCommerce Variation Swatches, Skipping Dropdowns?
WooCommerce variation swatches can replace dropdown menus while keeping eCommerce attributes and product variations working underneath. For tutorial purposes, we are going to use the Variation Monster plugin. It handles this setup across product pages, archive pages, styling controls, and final storefront testing. The setup follows eight connected steps, and skipping one can leave your shoppers with broken or confusing choices.
Step 1: Install Variation Monster Plugin
Make sure your store already runs WooCommerce before adding product variation swatches. Then open Plugins → Add New Plugin and search for Variation Monster. Install and activate the free plugin. Now you can customize product variation options.
Step 2: Enable Product Variation Swatches
Open Variation Monster → Variation Swatches Settings from the dashboard menu for configuration. Turn on Variation Swatches Enable, confirm single product display, and save the updated plugin settings.
Visual selectors appear only after valid attributes and variations are correctly connected to each variable product. The shop page controls remain separate, so we will configure those archive settings after styling individual swatches.
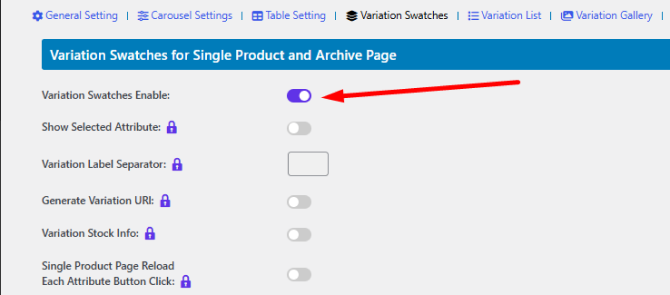
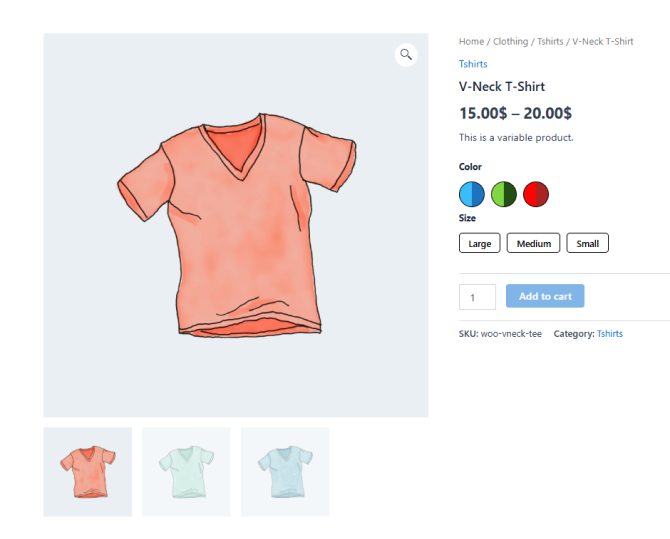
Once enabled, the dropdowns change into visible color and size swatches on the product page.
Step 3: Create Attributes and Terms
Open Products → Attributes and create clear names such as Color, Size, Material, Pattern, or Style. Choose Configure Terms beside each attribute, then add values like Red, Blue, Small, Medium, or Cotton.

Assign the correct color or image value whenever Variation Monster provides a matching visual field. Keep every term name readable because selected labels may appear beside swatches on customer-facing product pages. Correct attribute terms support every product variation and visual selector you create later.

Step 4: Build Product Variations
Open the product editor, then select Variable product from the “Product Data” dropdown menu below. Open Attributes, add the required options, select their values, and enable “Used for variations” before saving.
Next, open Variations and generate every valid combination, or create each needed combination manually instead. Add prices, stock levels, variation images, SKUs, and shipping details wherever each product requires them.
Make sure each variation has its price, stock, image, and other product details set correctly. Swatches only show the options you create, so they cannot fix missing data or incomplete variation combinations.
Step 5: Choose the Variation Swatch Type
Choose each swatch format according to how shoppers naturally compare that specific product attribute online.
- Use color swatches when shoppers compare shades such as red, blue, black, white, or green.
- Use image swatches for patterns, textures, fabrics, finishes, prints, or other appearance-based product choices online.
- Use button swatches for sizes, widths, lengths, pack quantities, or other short product measurement choices.
- Use label swatches when materials, model names, or descriptive choices need readable customer-facing text labels.
Step 6: Style Selected and Unavailable Options
Open the swatch styling controls and set width, height, border radius, and default border colors. You can choose a stronger, selected border color so shoppers can identify their current option without guessing.
Configure tooltips, selected attribute labels, unavailable states, and disabled styles for out-of-stock product combinations clearly. Rounded color swatches often suit fashion stores, while square images can present detailed patterns more clearly.
Every state should show what shoppers selected, what remains available, and which combinations cannot be purchased. Clear feedback prevents accidental choices and keeps the product selection process understandable across different screen sizes.
Step 7: Add Swatches to Shop Pages
Open the archive display settings so swatches should appear beyond each single product page too. Enable them for shop pages, product categories, or other WooCommerce archive pages where customers browse.
Choose whether selections preview attributes, open the product page, or support quick-cart behavior after configuration. Archive interactions follow your selected settings, so test every pathway before customers rely upon those controls.
That’s it. This is how easily you can replace default dropdown options with product variation swatches.
Step 8: Test the Storefront
Baymard’s 2026 benchmark found 52% of desktop and 62% of mobile product pages were mediocre or worse. Test single product, shop, and category pages on both desktop and mobile screens before publishing changes.
Select every swatch type across several combinations, then confirm images, prices, stock, and selected states. Check Add to Cart behavior, remove unused dropdowns, and correct invalid product variation combinations before launch.
Let Shoppers See More and Decide Faster
Product dropdowns still work, but they often make shoppers search for choices that should feel obvious. WooCommerce variation swatches bring those choices forward, so colors, sizes, and styles become easier to compare with confidence.
That clearer experience matters most when products depend heavily on appearance, fit, or personal preference. Variation Monster replaces plain selectors with visual choices that help shoppers move toward a confident purchase.
You May Also Like: