
Table of Contents
Are you searching for an easy way to image upload in WordPress for your users? If yes, this guide is exactly what you need.
While WordPress doesn’t offer a built-in feature for users to upload or change their profile images directly, there are effective plugins and solutions available to easily enable this functionality to enhance user interaction on your site.
You can easily enable image upload in WordPress with the plugin, which allows you to include an image upload field in both registration forms and the WordPress User Profile.
Before we begin the step-by-step tutorial, let’s first understand why adding a profile picture matters.
Why You Should Add ‘Image Upload’ in WordPress User Profile?
Images are more relatable than texts and so people connect instantly with pictures. If users are allowed to have profile pictures, then it will be easier for your audience to engage with your website. Besides, a profile picture is a way of adding a little bit of trust by simply letting people see the real person behind the comment or any other activity.
How to Add a User Profile Image in WordPress Using Gravatar
Gravatar means Globally Recognized Avatar. This website allows an individual to upload a single image of a profile, and then the same picture will be used on different websites automatically.
When you want to use this, the first thing the user needs to do is login with WordPress.com account in Gravatar.com website. If someone don’t already have an account, they can easily create one for free. After logging in, click the Create Gravatar button to begin setting up account.
The users can then upload their image from their device, previously used files, or a URL. They also have the option to switch email addresses or upload new images whenever they want from the Gravatar dashboard.
Once a Gravatar account is set, their avatar will automatically appear whenever they comment or participate in activities on websites that support Gravatar.
The Default Avatar also has settings that define what image should appear for users who do not have a Gravatar account. The choices consist of a plain mystery person silhouette, a blank placeholder with no image, the Gravatar logo, or many automatically generated icons that are dependent on the user’s email address.
That’s all you need to use Gravatar as your image upload in the wordpress user profile method. Now, let’s move on to the more flexible approach using another method.
Key Steps to Add ‘Image Upload’ in WordPress User Profile
While Gravatar is convenient, not all users want to rely on the same profile image across all platforms. Many prefer uploading a unique picture specifically for your website. While WordPress doesn’t include this feature by default, it can be easily enabled with the right plugins or custom solutions.
This time, plugins are a better choice, like User Registration Pro. It is a powerful drag and drop form builder, allows you to create registration forms that include an image upload in WordPress. Users can upload their pictures during registration and later update them from their profile area.
Below is a complete guide on how to set this up using User Registration Pro.
Step 1. Install the User Registration Pro Plugin
To begin, install the User Registration Pro plugin on your WordPress website. Go to the official User Registration Pro pricing page and choose a plan that supports WordPress user registration and file uploads, or you can download the free version from searching from plugins store.
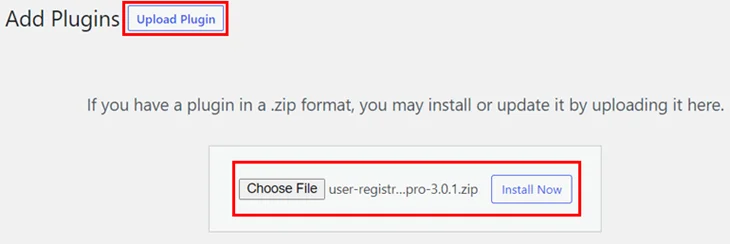
Once you have made the purchase, be sure to download the plugin ZIP file. Then go to your WordPress dashboard > Plugins > Add New > Upload Plugin > Upload the ZIP file > Click Install> Activate the plugin.
After activation, User Registration Pro may ask for a license key. Get the license key from your account dashboard at User Registration Pro and paste it into the required field.
Now, go to Settings > General > Check the box next to Anyone Can Register.
Step 2. Install and Activate the Advanced Fields Add-on
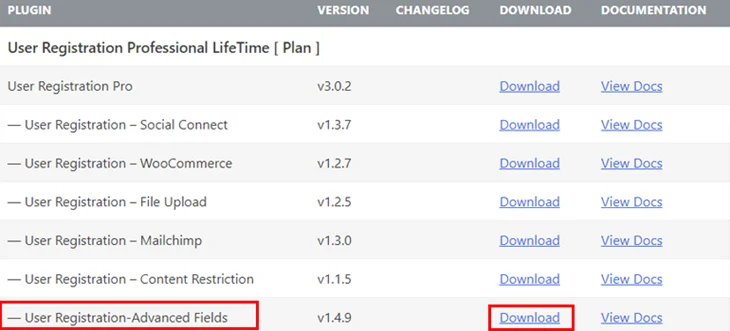
The User Registration Pro plan that you have may require additional Advanced Fields add-ons like the User Registration Add-on and File Upload Add-on. By using these add-ons, you can enable image upload in WordPress registration forms.
Firstly, go to the Downloads tab of your User Registration Pro account and download the add-ons you want. After that, install and activate each of them.
You are now building a WordPress form builder form with a profile image upload field.
Step 3. Build a Registration Form with a Profile Picture Field
Go to the dashboard of the User Registration Pro and locate the Add New Form option. Click on it.
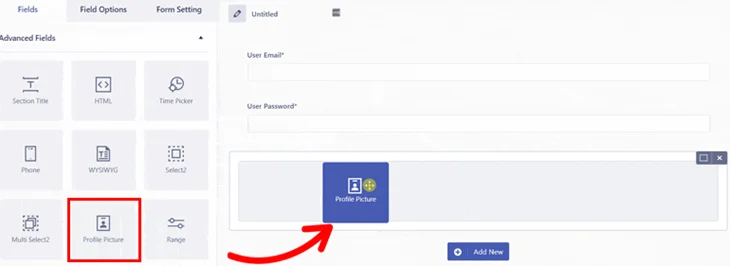
The drag-and-drop form builder will open. This is where you will find pre-populated fields like Email and Password. Adding more fields, such as First Name, Last Name, Username, Phone, or Address, is very easy by simply dragging them.
To allow image uploads, drag the File Upload field from the User Registration Pro field list and drop it into your form. The plugin lets you restrict uploads to specific formats such as JPG, PNG, or GIF, and you can control the maximum file size.
Once your fields are arranged, give your form a name, such as Profile Image Upload Form, and click Create Form.
You can then customize individual fields using the Field Options panel. Here you can edit labels, descriptions, styles, instructions, and validation messages.
Save your form once all changes are complete.
Step 4. Set Up File Upload Settings for the Form

Open the Form Settings tab in User Registration Pro to configure general and advanced settings.
The General settings allow you to activate strong passwords, set the user login method, select the default user role, turn on reCAPTCHA support, and configure the form success message and the redirection URL.
The Extras settings allow you to enable features such as a Reset Button, Field Icons, Auto Generated Password, and Honeypot spam protection.
After making your changes, click Update Form to save everything.
Step 5. Add the Registration Form to Your Site

It is now possible to insert your form into a WordPress page or post. Start a new page or make changes to the existing one. Adding a new block can be done by clicking the plus sign.
Search for the User Registration Pro Form block. Select it, then choose the form you created from the dropdown list.
Make the page live and so will your registration form with the image upload in WordPress be available on your website.
Users will now be able to upload their profile picture directly through the registration form. They can either select an image from their device or take a picture using their webcam before submitting the form.
Step 6. Update the Profile Picture via the User Profile

After signing up with your User Registration Pro form, users are allowed to change their profile picture whenever they want via the My Account page, which is created by the User Registration Add-on.
Once the user logs in, they will be able to see a dashboard where they have the option of editing their WordPress User Profile information. By clicking the Profile Details tab, they can remove the current image and upload a new one.
After clicking Save Changes, the new image will be updated instantly.
Conclusion
So, that is all for this simple guide on how to add image upload in WordPress user profiles by the use of User Registration Pro.
Enabling users to upload images by themselves makes your site more usable and lively. User Registration Pro is perfect for this as it provides versatile tools such as the drag and drop form builder, WordPress form builder, and Advanced Fields add-ons that ease the process for both site owners and users.
You May Also Like: